> ## Documentation Index
> Fetch the complete documentation index at: https://fillout.com/help/llms.txt
> Use this file to discover all available pages before exploring further.

# Workspaces

> Organize your forms with workspaces. Store forms in different folders and manage access across user types.

export const SupportBanner = () => {
  const titleId = React.useId();
  return <div className="support-banner" role="region" aria-labelledby={titleId}>
      <span className="support-banner__ring support-banner__ring--outer" aria-hidden="true" />
      <span className="support-banner__ring support-banner__ring--middle" aria-hidden="true" />
      <span className="support-banner__ring support-banner__ring--inner" aria-hidden="true" />
      <span className="support-banner__ring support-banner__ring--center" aria-hidden="true" />

      <div className="support-banner__content">
        <div className="support-banner__title" id={titleId} role="heading" aria-level="2">Still have questions?</div>

        <div className="support-banner__copy">
          <span className="support-banner__line">Our team is happy to help. Start a live chat using the</span>
          <span className="support-banner__line">
            chat bubble <span className="support-banner__chat-icon" aria-hidden="true" /> in the bottom right, or email us at
          </span>
          <span className="support-banner__line">
            <a href="mailto:support@fillout.com">support{'@'}fillout.com</a>
          </span>
        </div>

        <a className="support-banner__cta" href="mailto:support@fillout.com">Contact us</a>
      </div>
    </div>;
};

## Create a workspace

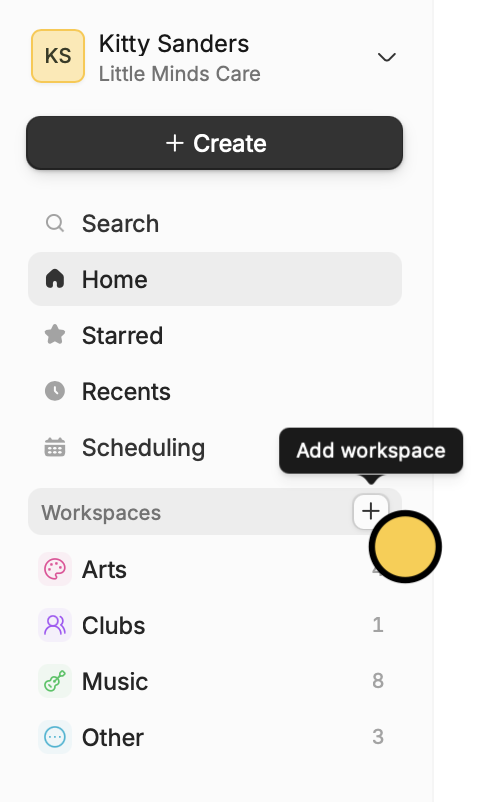
On your **dashboard**, hover and click <Icon icon="square-plus" /> to add a new workspace.

<img src="https://mintcdn.com/fillout-005a867b/sqMHL1vsq2FF7Mzj/images/Screenshot2025-10-09at4.37.21PM.png?fit=max&auto=format&n=sqMHL1vsq2FF7Mzj&q=85&s=61b0c9525d39e97f58d588effc72cf28" alt="Screenshot 2025-10-09 at 4.37.21 PM.png" title="Screenshot 2025-10-09 at 4.37.21 PM.png" style={{ width:"31%" }} width="483" height="802" data-path="images/Screenshot2025-10-09at4.37.21PM.png" />

You’ll now be redirected to your new **workspace**, which can also be accessed on the left-hand panel.

## Add a form to a workspace

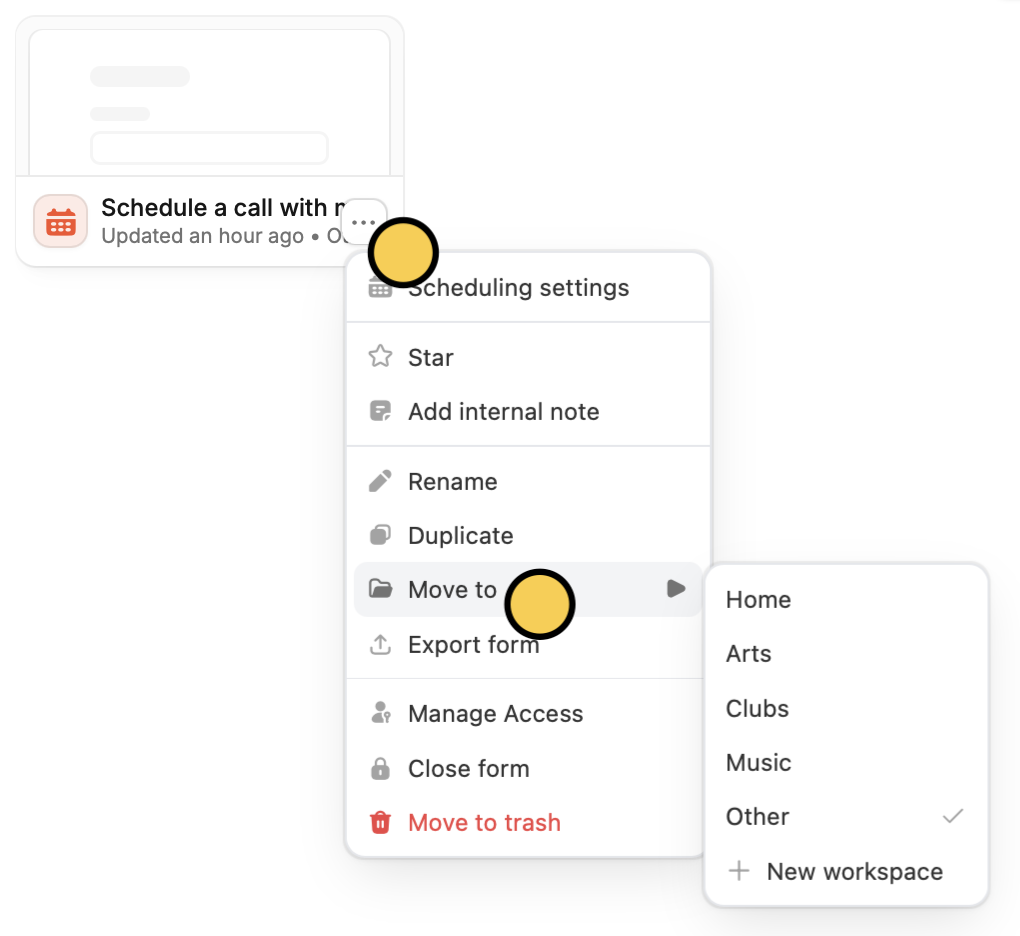
Click <Icon icon="square-ellipsis" /> followed by `Move to`. Then, choose the workspace you’d like to add the form to.
<img src="https://mintcdn.com/fillout-005a867b/sqMHL1vsq2FF7Mzj/images/Screenshot2025-10-09at4.40.39PMcopy.png?fit=max&auto=format&n=sqMHL1vsq2FF7Mzj&q=85&s=a7a4d5ddd0fa83a4fe918ddd611e9355" alt="Screenshot 2025-10-09 at 4.40.39 PM copy.png" title="Screenshot 2025-10-09 at 4.40.39 PM copy.png" style={{ width:"67%" }} width="1020" height="936" data-path="images/Screenshot2025-10-09at4.40.39PMcopy.png" />

Alternatively, you can drag and drop a form to your preferred workspace.

## Related articles

<CardGroup cols={3}>
  <Card title="Invite team members to your forms" icon="user-plus" iconType="regular" color="#FFC738" href="/help/invite-collaborators">
    View results, and edit forms with free seats.
  </Card>

  <Card title="Import and export forms" icon="folder-open" iconType="regular" color="#FFC738" href="/help/importing-and-exporting-forms">
    Transfer between different accounts.
  </Card>

  <Card title="Organizations" icon="building" iconType="regular" color="#FFC738" href="/help/organizations">
    Create organizations for different companies with the same email.
  </Card>
</CardGroup>

<SupportBanner />